GILBARCO G-SITE SETUP
S2K.NET on GSITE
1. Verify POS connection
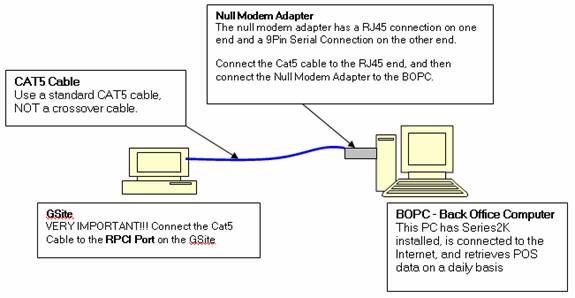
• Hardware connection: Refer to figure “GSite Hardware Configuration” diagram below:
o GSite –Connect the CAT5 Cable to the RPCI port on the GSite
o BOPC (Back Office PC) – Connect the Null Modem Adapter to the BOPC’s serial port
§ GSite Null Modem Adapter – The null modem adapter has a RJ45 connection on one end and a 9 Pin Serial Connection on the other end.
§ Connect the Cat5 cable (DO NOT use a crossover cable).to the RJ45 end, and then connect the Null Modem Adapter to the BOPC’s serial connection.
2. Save G-Site files from S2k downloads page onto PC in Series2000 folder under data. Create a new folder for the files called GFTPS.
a. Run the setup.exe file (click, run, next etc when prompted)
3. Gather GSite Settings. You will have to contact the customer, and have him/her go to the Main GSite and perform the following steps…
a. Change the current mode to “Manager Mode”
b. Select “Station Data Programming”
c. Select “Station Information Programming”. The following information will be displayed: (Write Down What is Read to yo9u by the Customer)
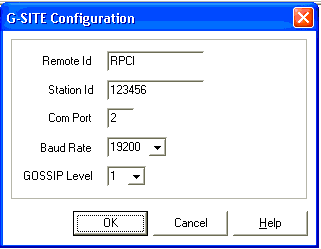
d. Station ID: This is very important, because you will use this as the password to gain access to the GSite. If it is blank, have the customer change it to 123456. Be very careful and keep track of what you are doing here.
e. Baud Rate: Whatever the numerical value you are given, you have to make sure it is greater than 19,2000
f. Gossip Level: 1 or 2 is fine. You are doing a direct FTP connection, you must set your Gossip Level to FTP, then reboot.
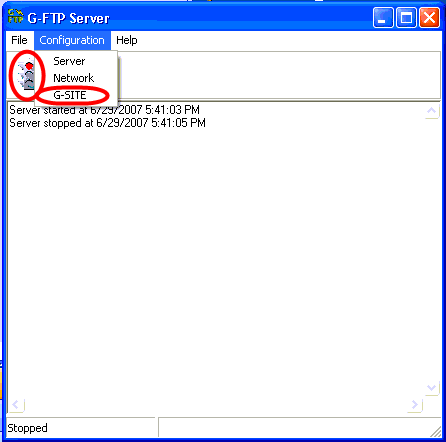
To do the GSite settings that are given to you by the customer (i.e. baud rate, station ID and gossip level), click on the stoplight to stop communication attempt. This allows you to open the configuration menu. Select G-SITE.
Change settings as needed and click ‘OK’.
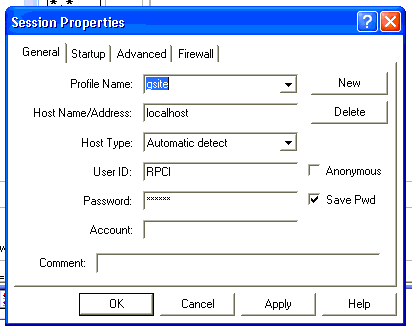
WSFTP
Once you open the program, click on New in the window shown below. Enter the rest of what is shown below. After checking the ‘Save Pwd’ box, click apply. Once you are done, click ‘OK’. The GSFTP program needs to be open in order to connect. You can click connect on the bottom left to try to connect again if the GSFTP was not open when you clicked ‘OK’ in the window below.
g.
4. Confirm GSite is Connected. On the BOPC, open a DOS window, and type “ipconfig /all” you will be see the following…
5. Establish Communications with POS:
• Verify physical connections have been established
• Have the manager visually verify Ruby Connector is connected to PC, and the other end of the cable is connected to the Ruby.
6. Send data from POS to S2K.NET
Log into S2k.Net and send data from S2K.NET to GSite
Get the PLU Batch Current file from the GSite
 Getting Station Information from a
loans loans
loans loans
loans loans
loans loans
loans loans
loans loans
loans loans
loans loans
loans loans
loans loans
loans loans
loans loans
loans loans
loans loans
loans loans
loans loans
loansloans
loans loans
loans loans
loans loans
insurance insurance
mortgage mortgage
Getting Station Information from a
loans loans
loans loans
loans loans
loans loans
loans loans
loans loans
loans loans
loans loans
loans loans
loans loans
loans loans
loans loans
loans loans
loans loans
loans loans
loans loans
loansloans
loans loans
loans loans
loans loans
insurance insurance
mortgage mortgage